CONFOCAL MICROSCOPY – A VISUAL SLICE OF THE CELLULAR WORLD
(August, 2004)
Seeing a cell is an essential aspect of cell biology. To the small world of the cell, confocal microscopy is a major advance upon normal light microscopy since it allows one to visualize not only deep into cells and tissues, but to also create images in three dimensions [1]. There are many aspects to a confocal microscope that make it a much more versatile instrument than a conventional fluorescence microscope. Although the confocal microscope is often thought of as an instrument that can create 3D images of live cells, the great versatility of the machines means that many creative ways of examining not just the structural details, but also the dynamics of cellular processes, are being developed [1].
An Introduction to Confocal Microscopy
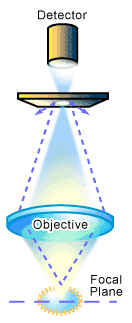
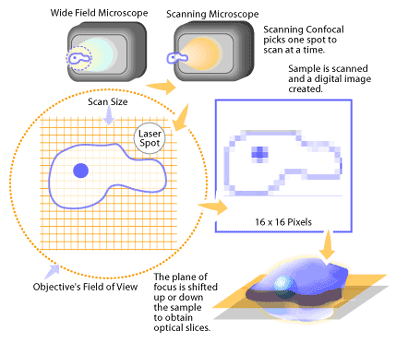
The term confocal refers to the condition where two lenses are arranged to focus on the same point1. The major optical difference between a conventional microscope and a confocal microscope is the presence of the confocal pinholes, which allow only light from the plane of focus to reach the detector (see Figure 1). This forms the principle of a confocal microscope where “out of focus” light is removed from the image by the use of a suitably positioned pinhole. This produces images of exceptional resolution and clarity, and also allows the user to collect optical slices of the object for use in creating a 3D representation of the sample. How does this work? It involves changing the level or plane at which the sample is observed. If the plane of focus is changed, or the object moved, a series of images at different positions can be produced through the thickness of the object, i.e. a series of X-Y images at different Z positions. Such a series of images (a stack) is a three dimensional representation of the object being looked at, produced by optical (as opposed to physical) sectioning (see Figure 2). This is the main feature and a major advantage of confocal microscopy over conventional microscopy [1].
In practice, the confocal principle is combined with a scanning system utilizing a laser light source [1-2]. This builds up an image by scanning a point of laser light across the sample in X and Y directions (see Figure 2). In the case of a laser scanning system, the detector of reflected light from the sample is generally a photomultiplier tube. The signal from the photomultiplier tube is converted to a digital form that contains information on the position of the laser in the image and the amount of light coming from the sample. A computer is used to store the intensity value of each point from the detector, and presents these in the correct order on a high-resolution video monitor to display the image. The image is displayed on the computer screen as a shaded gray image with 256 levels of gray that can be suitably coloured later for presentation or publication. To collect a series of images, the computer then shifts the focus by a fixed amount and the object is scanned again to produce the next image at the different Z position. This image is stored and the process repeated to build the 3D data set.
Confocal microscopes possess several advantages over conventional microscopy. First, confocal microscopy produces images of improved resolution, up to 1.4 times greater than standard microscopy, by eliminating out-of-focus light. Confocal microscopes also have a higher level of sensitivity compared to conventional microscopes, due to highly sensitive light detectors and the ability to accumulate images captured over time. Another key advantage of confocal microscopy is the ability to produce 3-dimensional reconstructions of specimens as mentioned above. Computer software is then used to digitally reconstruct 3D representations of the sample. Confocal microscopy is also a less invasive form of imaging. This is due to the use of high-power laser illumination and the reduction in light-scattering artifacts, allowing the non-invasive imaging of thick sections of semi-transparent tissues [2].
Setting up To View a Sample on a Confocal Microscope
Unlike samples for conventional microscopy, tissue and cell preparations for confocal microscopy do not need to be thin [3]. There is little or no advantage in viewing a thin section with a confocal microscope. It is possible to optically section several millimeters into a transparent tissue at low magnification (20X objective) while the practical limit with a normally opaque tissue with a 63X objective lens may be 20 micrometers or less.
In confocal microscopy, as in conventional microscopy, it is necessary for the tissue specimen of interest to demonstrate some form of optical contrast between different areas of the sample for visualization [1-3]. This requires staining of the tissue specimen using a label that either absorbs or reflects light or is fluorescent. As a general guide, fluorescent labels are most versatile and represent a good starting point. Most staining protocols that work well for conventional microscopy can be easily adapted for confocal microscopy, although for thick tissue sections, the diffusion of labels into tissue is often a major limiting factor. It may be useful to increase the degree of staining for some tissue sections in confocal microscopy since thin optical sections of the samples are used. In other cases, it may be necessary to considerably increase incubation periods and to use detergents (such as 1% Triton-X100 in PBS for 4 hours) or other treatments to allow the label to penetrate [4]. Vibratome sections of solid tissues (50-100 _m thick) are a useful way to prepare thick tissue for confocal microscopy [4].
Different Types of Confocal Microscopes
With a prepared sample, it is next necessary to choose what type of confocal microscope to use? Two types of microscope are most common: (1) a laser scanning confocal microscope (LCSM) and (2) a two-photon confocal microscope. Both of these microscopes are used to give optical sectioning of a sample, but do so in a different manner.
In a typical set-up for a laser scanning confocal microscope, a pinhole is placed in front of the light source to produce a distinct and spatially constrained illumination point (See Figure 3). The light passing through this pinhole is focused on the sample, while a second pinhole is placed in front of the light detector. If the optical distance from the detector pinhole to the focal point (the point in which the light is focused) is exactly the same as that between the focal point and the illumination pinhole, only the light generated at the focal point will reach the detector since the pinhole will block out the out-of-focus light. The signal from the detector is then digitized and passed to a computer. The image of the sample is digitally built up by scanning the sample in the X and Y directions and then special software is used to reconstruct a digital image [1-3].
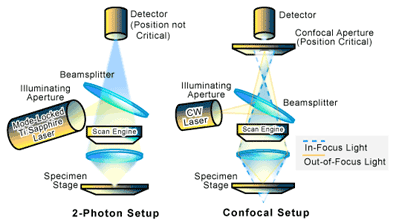
Two-photon, also referred to as multi-photon, microscopy setups are virtually the same as laser scanning confocal microscopy, except that the need for pinholes is eliminated. Optical sectioning of the sample is instead achieved through the use of a mode-locked Ti:sapphire laser which operates in the near-infrared (see Figure 3). The laser produces a high photon density (tens of kilowatts of peak power in a series of low-energy pulses that are approximately 10nJ per pulse) that is tuned to a wavelength about twice that of the intended absorption wavelength of the sample. What this means is that two or more photons are required at a single point to produce an optical signal (i.e. excitation) that can be detected. The probability of such a two-photon event occurring is limited to the focal plane where there is an extremely high photon density. As a result, in 2-photon imaging, excitation occurs only at the plane of focus [2].
There are several major advantages in the use of the rather expensive and technically sophisticated two-photon confocal microscopy versus laser scanning confocal microscopy. First, out of focus bleaching (the loss of optical signal production due to sample damage from the laser) is reduced [2]. Two-photon microscopy also increases sample penetration because of the reduced absorption of near-infrared radiation. This allows thick, live tissues to be imaged with little damage to the sample environment [5]. In addition, two-photon microscopy is believed to increase sensitivity since the elimination of the pinhole allows the entire signal to reach the detector [2].
Applications of Confocal Microscopy
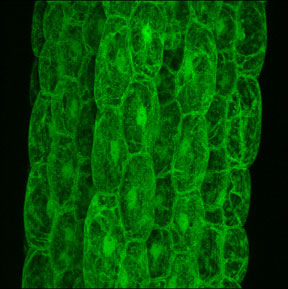
Confocal microscopy is now being used in a large variety of scientific fields [5-6]. Some of the applications include the use of confocal microscopy for live cell imaging. This is often done by making use of a green fluorescent protein (GFP) (Figure 4) or other fluorochromes attached to cellular components (proteins, genes, cell structures) and imagining their position or movements. Confocal microscopy is also used to analyze subcellular functions, such as pH gradients and membrane potentials, using specific fluorescent dyes and to measure intracellular changes in ion concentrations of molecules such as calcium, sodium, magnesium, zinc and potassium.
Confocal microscopy, whether laser scanning or the novel two-photon system, has generated a tremendous amount of excitement in the research community. This technique has rapidly become the technique of choice for researchers, particularly in the biosciences. With the recent availability of more affordable confocal and two-photon microscopes, this technology holds a great deal of potential for allowing the visualization of the cellular world.
Additional Reading
1. Nikon Microscopy U. An Introduction to Confocal Microscopy
2. Matsumoto B. 2002. Cell Biological Applications of Confocal Microscopy. San Diego: Academic Press. 507 p.
3. Diaspro A. 2002. Confocal and Two-Photon Microscopy: Foundations, Applications, and Advances. New York: Wiley-Liss. 567 p.
4. Wright SJ, Wright DJ. 2002. Introduction to Confocal Microscopy. Methods Cell Biol 70: 1-85.
5. Piston DW. 1999. Imaging Living Cells and Tissues by Two-Photon Excitation Microscopy. Trends Cell Biol 9(2): 66-9.
6. McWilliams A, et al. 2002. Innovative Molecular and Imaging Approaches for the Detection of Lung Cancer and its Precursor Lesions. Oncogene 21(45): 6949-59.
References
1. Hibbs A. 2000. Confocal Microscopy for Biologists: An Intensive Introductory Course. BIOCON ed. pp. 2-9.
2. Rawlings S, Byatt J. 2002. How Microscopy Produces a Sharper Image. In “Scanning Microscopy.” Biophotonics International: Laurin Publishing Co. Inc. pp. 1-4.
3. Bacallo R, et al. 1990. Guiding principles of specimen preservation for confocal fluorescence microscopy. In “Handbook of Biological Confocal Microscopy” New York: Plenum. Pp. 197-205.
4. Humphrey E, Norman K. 2001. A Practical Introduction to Confocal Microscopy: for Users of the Bio-Rad Radiance 2000 Confocal Microscope. University of British Columbia, pp. 1-15.
5. Michalet X, et al. 2003. The Power and Prospects of Fluorescence Microscopies and Spectroscopies. Annu Rev Biophys Biomol Struct 32: 161-182.
6. Stevens JK, et al, eds. Three- Dimensional Confocal Microscopy: Volume Investigation of Biological Systems. London: Academic Press.
7. Carnargie Institude of Washington, Department of Plant Biology, Cell Imaging.
(Art by Jane Wang – note that high res versions of image files available here)