A CHEMISTRY STUDENT’S INNER VOICE GUIDE TO ACID/BASE TITRATION
A. INTRODUCTION
.: This experiment consists of two parts. The first is designed so that you may screw up and not face any further consequences. The second requires your utmost diligence, as the products from this experiment will serve as the basis of every other experiment for the rest of the semester.
.: In the first part, you will use a primary standard solution of potassium hydrogen phthalate (pronounced ‘phth-al-ate’) to standardize a roughly 0.1 molar solution of sodium hydroxide. This is perhaps the easiest exercise performed in any laboratory on campus, and your soul will be crushed as you later discover the preceding clause is far more accurate than you had realized. Once you have determined the exact (read: approximate) molarity of the sodium hydroxide solution, you will set it aside in a bottle already labeled “primary solution” by an earlier student who bypassed the designated labeling tape and went straight for the permanent marker instead. You, also being lazy, will simply write “secondary solution” on the other side of the bottle so that you may later forget which is correct.
.: In the second part of the experiment you will use the standardized sodium hydroxide solution to woefully miscalculate the concentration of hydrochloric acid solution (which should be about 0.15 M, but you will divide the wrong value into your figures and get ~255 M-L). During both of these titrations, you will record the pH levels of the solutions using antiquated equipment you would expect to find in a scientific version of the Salvation Army. These readings will not be used for calculating the exact concentrations of sodium hydroxide and hydrochloric acid, but you will be forced to graph them anyway. (You are encouraged to develop an inexplicable fondness for sigmoidal curves to help alleviate the tedium associated with and facilitate the completion of this part of the exercise.) Data for these calculations will instead be obtained via divine revelation. In addition, The Elders have decreed that only a select few students will be granted a deeper understanding to the mysterious secrets of nature, which should bring the class average to a C.
.: You will use the acid-base indicators phenolphthalein and bromthymol blue during the titrations. You will forget to add an indicator to at least one of your titrations and will spend forty minutes of laboratory time wasting a good one-third of your potassium hydrogen phthalate solution wondering when it will change colors. Before we proceed to the instructions for this experiment, it might be useful to explain, in detail, the concepts behind acid-base indicators.
.: pH and Acid-Base Indicators. Reviews of previous class performances have revealed that students do not pay attention to any of the text between the introduction and the instructions. In the interest of brevity, the authors of this edition of your laboratory manual have decided to summarize the section on pH and acid-base indicators thusly: if it’s clear, it’s an acid; if it’s pink, it’s a base.
B. STANDARDIZATION OF A SODIUM HYDROXIDE SOLUTION
.: Preparation of Primary Standard KHP Weigh 7.5 grams of primary standard KHP into a clean, dry weighing bottle using the broken rough balance. Be sure to sweep away all of the excess KHP powder you spilled before your TA notices. Dry the sample in the oven at 27 oC for two hours, then wait for your TA to realize the oven has been off for the past two hours. Call it a day. When you return to find your freshly dried sample knocked over by another careless student, start the process over. Do not fret, you were only two steps in anyway. Re-weigh your sample and dry for two hours at 110 oC. Read a book in the meantime.
.: After the sample is dry and ready, dwell for a few more minutes on the time you wasted reading when you could have been preparing for the next step.
.: Preparation of Carbonate-Free NaOH. Using a 1500 mL beaker, bring 1100-1200 mL of deionized water to a vigorous boil. After spending a good fifteen minutes doing so, listen for your TA to say that it’s OK to skip this step.
.: The apparatus necessary for filtering the sodium carbonate precipitate from the 50% NaOH solution is shown in Figure 1. Assemble this apparatus first.
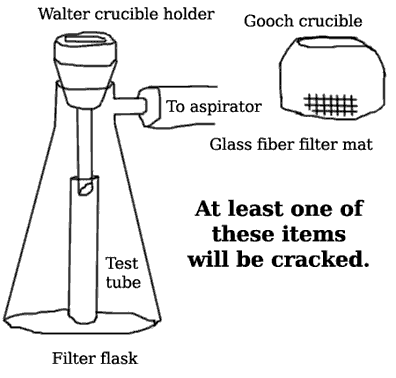
Figure 1. Correct Assembly for Filtering a Concentrated Sodium Hydroxide Solution. The filtered NaOH is collected in the test tube, unless it’s leaky. Be sure to watch the student next to you as he turns off the vacuum before disconnecting the rubber tube. It’s hilarious.
- Use a Walter crucible holder, filter flask, and a test tube as shown.
- Wait for your TA to come around and configure the apparatus to correct for a glaring error in the laboratory manual.
- Do not try to suspend the test tube in which you are going to collect the filtrate. Just let it drop down in there. Don’t worry about cracking it — chances are it was cracked to begin with.
- The concentrated NaOH solution is very caustic and will attack filter paper. Glass fiber mats will be required. BE SURE TO WEAR YOUR SAFETY GLASSES, WHICH THIS $103 MILLION BUILDING WILL NOT PROVIDE.
- Pour the NaOH solution in the Walter crucible and turn on the vacuum seal.
- Make sure every drop of NaOH solution makes it into the test tube.
- Good luck trying to get the test tube out.
.: To prepare one liter of 0.1 M NaOH add 8 grams (use the rough balance; we don’t trust you with the analytical balance yet) of reagent grade NaOH and 8 mL of deionized water to a small (50 mL) beaker. You will be interrupted at this point by a lab partner who is still trying to figure out the filtration assembly. Once you are done helping them the NaOH tablets will have formed an impenetrable solid mass at the bottom of the beaker. Stir the solution. Keep stirring. Almost there. Don’t spill! Nobody saw it. Keep going. Recoil in horror as you discover a massive contaminating stain on the inside of your glass beaker. Start over. CAUTION, THIS PROCESS IS VERY EXOTHERMIC AND THE SOLUTION WILL BECOME VERY HOT. BE SURE TO BUY NEW PANTS AFTER THE LAB, YOU CLUMSY OAF.
.: Run the concentrated NaOH solution through the filter assembly. The filtrate should look clear, but it won’t. Run the concentrated NaOH solution through the filter assembly again. After that, filter the solution once more, this time remembering to place the glass fiber mat inside the crucible. You will need 6 mL of this solution, but by now you have spilled 3 mL, bringing your total to no more than 5 mL.
.: To one liter of cooled, boiled, deionized water add 6 mL of the filtered 50% NaOH solution. Shake the solution thoroughly to ensure that is homogenized, then quickly wash the hand that held the unsecured cap.
.: Preparation of Primary Standard KHP Solution. After the weighing bottle containing the KHP has cooled to room temperature, weigh it to the nearest 0.1 mg (four places beyond the decimal). Shit yourself when the TA explains that the analytical balances can detect the weight of a fingerprint. The correct weighing procedure is called “weighing by difference”.
.: After recording the weight of the weighing bottle containing KHP, carefully pour all the KHP into a clean 400 mL beaker. Replace the cap on the weighing bottle and weigh it again to the nearest 0.1 mg. Record the difference in weight in your laboratory notebook. Your result should look something like 7.4591 ± Fingerprint.
.: Add approximately 100 mL of deionized water to the beaker and swirl over a small Bunsen burner flame, which you have no idea how to adjust. Do not use a stirring rod unless you want to clean it later. Do not allow anyone to see you let any solid or solution to splash out of the beaker. Transfer the solution QUANTITATIVELY to a 250 mL volumetric flask using a glass funnel and a stirring rod. Look up “quantitatively” in the back of your manual and realize we simply meant “transfer all of the solution to a 250 mL volumetric flask.” Carefully add more deionized water until the solution in the flask overflows.
.: Standardization of the NaOH Solution. The titration will require the use of a pipet and a buret. (Striking a Faustian bargain is recommended for students who wish to learn how to use a pipet without spilling.) These pieces of glassware must be properly cleaned in a special, tedious manner. You are better off simply breaking these items and requesting new, sterile ones from the stockroom.
.: FOR THE FIRST TITRATION ONLY, obtain a pH meter from the stockroom. Calibrate the pH meter by handing it to your TA and saying, “it doesn’t work, can you fix it?” Pipet a 25.00 mL aliquot of the standard KHP solution into a beaker and add 3 drops of phenolphthalein as indicator. Measure the pH of the solution and record it on the yellow carbon-copy page in your laboratory notebook. Flip the notebook to the white page on top of the yellow page and carefully trace the numbers so that your TA will not notice your mistake. Titrate by adding 1.0 mL increments of the NaOH solution, beginning with the buret filled to the 0.00 mL. Record the pH after each increment. Note that the volume at which the pH changes by several units and the color changes from colorless to red is the approximate end point volume. Wonder aloud how the buret now suddenly reads 0.5 mL differently from what you last wrote down, then observe the fresh leak at the stopcock. Continue anyway, this titration is only for the titration curve — no calculations will be made from this data.
.: NOTE: If you are red-green color blind to any extent, you are permitted to spend up to 10 minutes of laboratory time cursing the genes your parents gave you, specifically your mother’s.
.: Based on the approximate end point volume determined in the first titration, calculate the approximate molarity of the NaOH solution. FOR ALL SUBSEQUENT TITRATIONS pipet a 25.00 mL aliquot of the standard KHP solution into a 250 mL Erlenmeyer flask. Repeat titration of NaOH until you exhaust your KHP solution. Cherry-pick the data to find the most reliable titrations. Use fancy statistics to justify your selections and to cover your tracks.
C. DETERMINATION OF THE ACID UNKNOWN.
.: Using a clean, dry 250 mL Erlenmeyer flask obtain about 200 mL of HCl solution from the stockroom. Misleading headings to the contrary, you will not work with any unknown substances during this portion of the experiment. Pipet a 25.00 mL aliquot of the HCl solution into a 400 mL beaker and mistakenly add 3 drops of phenolphthalein, then add 3 drops of bromthymol blue to counteract the 3 drops of phenolphthalein, then add 3 more drops of bromthymol blue as indicator. Titrate with 50 mL of NaOH solution until the solution in the beaker turns blue. DO NOT DRINK THE RESULTING SOLUTION.
.: Record the volume of NaOH solution added and the degree of color change during each increment. Repeat procedure until you have four reliable titrations or until your laboratory period is almost over. From your data, calculate the molarity of the HCl solution (see Sample Calculations in Ancillary, available in the university bookstore for $45).
D. TITRATION CURVES.
.: Prepare titration curves for both KHP and HCl titrations by plotting pH as a function of volume of NaOH added and drawing a smooth curve through the data. Data which does not fit in a smooth function may be discarded without consequence. Plot both titration curves on the same graph, making sure to screw up on the second plot every time in order to more completely familiarize yourself with the graph-making process. Plot all remaining data points and draw circles around each data point for the KHP solution and squares around each data point for the HCl solution. Label the colors of the solutions at the data points immediately before and immediately after the end points for both titrations. Staple the graph paper to the back of the report sheet. This ridiculously easy task will count for half of your grade for this experiment, and you will still only score 70% of the points available.
E. QUESTIONS
- Which instrument used in this experiment was the most unreliable? Why?
- Several other classmates completed this experiment before you. What did they do better?
- Which solution was more damaging to your clothing — HCl, NaOH, or KHP? Why?
- Could you see yourself doing this kind of work for the rest of your life? If no, explain your answer in detail; if yes, liar.
- Is it too late for you to switch majors? Discuss this question with your adviser.